
kip
Image - an image processing library based upon Vix
Image is an image processing library for Elixir. It is based upon the fabulous vix library that provides a libvips wrapper for Elixir.
Image is intended to provide well-documented, performant and reliable common image processing functions in an idiomatic Elixir functional style. It operates at a layer above the very comprehensive set of functions in Vix and libvips.
In a very simple image resizing benchmark, Image is approximately 2 to 3 times faster than Mogrify and uses about 5 times less memory.
Since Image is based upon Vix and libvips it is performant, concurrent, pipelining and has a low memory footprint.
In this first release it focuses on resizing, cropping, masking, corner rounding, circular cropping, metadata extract, metadata minimisation. It also includes some simple functions to make it easy to resize and compress images for many well-known social media platforms at the correct size.
In the next two releases, Image will:
- Provide streamed image processing. That will allow an image to be streamed from a file, or from S3 or from any Elixir stream or enumerable, process the image and then stream its output - including to chunked responses for HTTP applications.
- Provide bi-directional Integration with Nx that will efficiently share memory buffers and make it even simpler to involve image processing in ML applications.
Simple examples
Resize to fit
 Image.resize(image, 200, crop: :none)
Resize to fill
 Image.resize(image, 200, crop: :attention)
Crop image
 Image.crop!(image, 550, 320, 200, 200)
Rounded corners
 image |> Image.resize!(200, crop: :attention) |> Image.rounded!()
Avatar (circular mask, remove most metadata, crop to a subject of interest)
First Post!

webuhu
Wonderful. ![]()
Mind to tag within the repository for the ex_doc source links and links on Hex.
Most Liked
kip
@Exadra37 well, I couldn’t help myself so I put some work into an API for text and shape overlays. Not quite ready for formal release yet but its available to try from GitHub in the text branch. These demos are in the lib/demo.ex file.
Reproducing the example

The code that produced this is:
  def demo1 do
    {:ok, base_image} = Image.open("test/support/images/Singapore-2016-09-5887.jpg")
    {:ok, polygon} = Shape.polygon(@points, fill_color:  @polygon_color, stroke_color: "none", height: Image.height(base_image), opacity: 0.8)
    {:ok, explore_new} = Text.new_from_string("EXPLORE NEW", font_size: 95, font: "DIN Alternate")
    {:ok, places} = Text.new_from_string("PLACES", font_size: 95, font: "DIN Alternate")
    {:ok, blowout} = Text.new_from_string("BLOWOUT SINGAPORE SALE", font_size: 40, font: "DIN Alternate")
    {:ok, start_saving} = Text.new_from_string("START SAVING", font_size: 30, padding: 20, background_fill_color: "none", background_stroke_color: "white", background_stroke_width: 5)

    base_image
    |> Image.compose!(polygon, x: :middle, y: :top)
    |> Image.compose!(explore_new, x: 260, y: 200)
    |> Image.compose!(places, x: 260, y: 260)
    |> Image.compose!(blowout, x: 260, y: 340)
    |> Image.compose!(start_saving, x: 260, y: 400)
    |> Image.write!("/Users/kip/Desktop/polygon.png")
  end
Simple Text Overlay
Which is created with:
def demo3 do
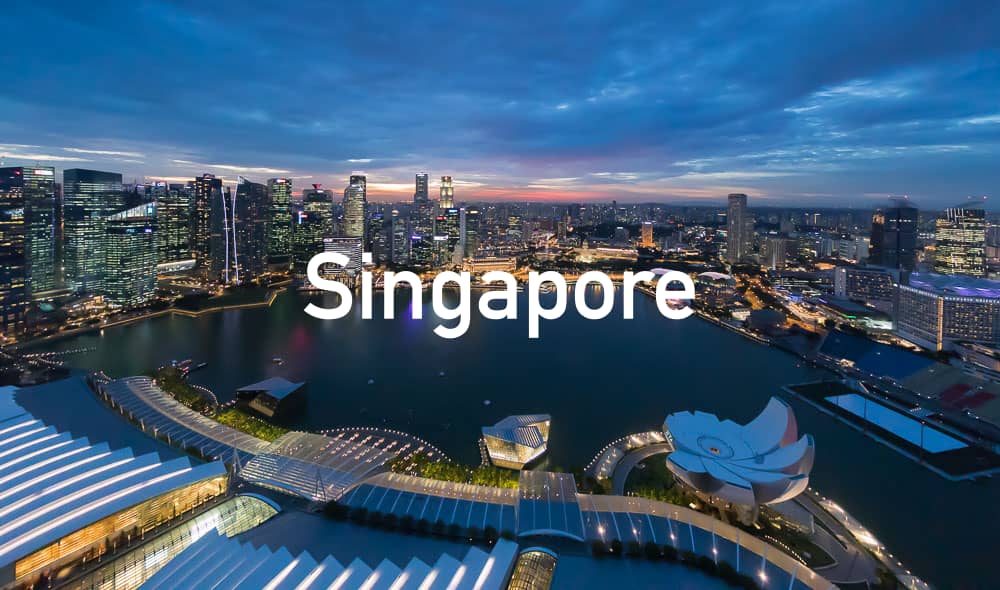
{:ok, base_image} = Image.open("test/support/images/Singapore-2016-09-5887.jpg")
{:ok, singapore} = Text.new_from_string("Singapore", font_size: 100, font: "DIN Alternate")
base_image
|> Image.compose!(singapore, x: :center, y: :middle)
|> Image.write!("/Users/kip/Desktop/center_text.png")
end
Transparent Text

This one is quite fun. Reversed text, full screen overlay with transparency. Created with:
  def demo2 do
    {:ok, base_image} = Image.open("test/support/images/Singapore-2016-09-5887.jpg")
    {:ok, singapore} = Text.new_from_string("SINGAPORE", font_size: 250, font: "DIN Alternate", padding: base_image, text_fill_color: :transparent, background_fill_color: "black", background_fill_opacity: 0.6)

    base_image
    |> Image.compose!(singapore)
    |> Image.write!("/Users/kip/Desktop/overlay.png")
  end
Should be able to have both text overlays and shape overlays finished on the weekend.
kip
Today brings the introduction of something I’ve been working on since I started image four years ago.
- An Plug-based image CDN, published in image_plug
- A set of responsive image components, published in image_components
- An image playground for testing and experimentation.
Why build a CDN plug when there are so many image CDNs already?
- They can be very expensive, when the requirements are often not that complex
- Its easy to get tied to one CDN URL structure or API and its difficult to change
- Its complex if you want to iteratively test in a local environment
- Because you might want to build and offer an image CDN as a corporate resource or as a SaaS offering.
- Because libvips via the fabulous vix
Features
- High performance, optimised imaging pipeline.
libvipsviavixmeans we have access to thelibvipsstreaming pipeline that can stream images from disk, or S3 and transform them in a space and time efficient manner. - A pluggable API server build over a common AST-like imaging pipeline allowing you to build your own API structure over the standard imaging pipeline.
- Out-of-the-box support of the URL API structure of several of the big commercial CDN players so that you can use
image_plugin development and a commercial CDN in production without code change. Ships with support for:- Cloudflare Images
- Cloudinary
- Imgix
- ImageKit
- IIIF servers
- Simple client library,
image_componentsthat is used for all CDNs modelled on the excellent unpic javascript library. - Support generation of optimised image sets with the
.imagecomponent as well as art direction if you use the.picturecomponent.
Live Playground
You can experiment with what these libraries provide in a simple playground at https://image-playground.fly.dev. Be gentle, it bundles the image, image_vision (with several large ML models), Nx and EXLA libraries all on a fly.io’s small VPS server.
If you want to explore more, run the playground on your own machines. It’s mountable inside a Phoenix app or you can run it standalone. The README has all the relevant info.
Example
An example image in the playground, face-aware cropping, some vignetting added.

kip
Today is object detection Sunday. Greatly inspired by the fabulous talk by @hansihe at the Warsaw Elixir Meetup earlier this month I transcribed his live coding example and implemented it in a new experimental module, Image.Detection.
Based upon his solid observations I also added some quality of life improvements to the detect branch of Image:
Image.from_kino/2andImage.from_kino!/2to easily consume the image data from aKino.Input.Imagedata source in LivebookImage.Shape.rect/3andImage.Shape.rect!/3to have a composable way to draw rectangles - specifically object bounding boxes in this case.Image.embed/4andImage.embed!/4to make it much easier to conform an image to the dimensions required by an ML model.
The code is ready for fun and experimentation. Given some of the tricky dependency configuration at the moment it can only be used as a GitHub dependency for now. You can add it in a mix.exs as:
{:image, github: "elixir-image/image", branch: "detect"}`
Demo example
Livebook coming this week!
iex> i = Image.open!("./test/support/images/elixir_warsaw_meetup.png")
%Vix.Vips.Image{ref: #Reference<0.3196308165.1633288229.90166>}
iex> Image.Detection.detect(i)
{:ok, %Vix.Vips.Image{ref: #Reference<0.3196308165.1633288229.90638>}}

The code
Its amazing how little code this takes with Nx, Axon and Axon Onnx.
  def detect(%Vimage{} = image, model_path \\ default_model_path()) do
    # Import the model and extract the
    # prediction function and its parameters.
    {model, params} = AxonOnnx.import(model_path)
    {_init_fn, predict_fn} = Axon.build(model, compiler: EXLA)

    # Flatten out any alpha band then resize the image
    # so the longest edge is the same as the model size,
    # then add a black border to expand the shorter dimension
    # so the overall image conforms to the model requirements.
    prepared_image =
      image
      |> Image.flatten!()
      |> Image.thumbnail!(@yolo_model_image_size)
      |> Image.embed!(@yolo_model_image_size, @yolo_model_image_size)

    # Move the image to Nx. This is nothing more
    # than moving a pointer under the covers
    # so its efficient. Then conform the data to
    # the shape and type required for the model.
    # Last we add an additional axis that represents
    # the batch (we use only a batch of 1).
    batch =
      prepared_image
      |> Image.to_nx!()
      |> Nx.transpose(axes: [2, 0, 1])
      |> Nx.as_type(:f32)
      |> Nx.divide(255)
      |> Nx.new_axis(0)

    # Run the prediction model, extract
    # the only batch that was sent
    # and transpose the axis back to
    # {width, height} layout for further
    # image processing.
    result =
      predict_fn.(params, batch)[0]
      |> Nx.transpose(axes: [1, 0])

    # Filter the data by certainty,
    # zip with the class names, draw
    # bounding boxes and labels and the
    # trim off the extra pixels we added
    # earlier to get back to the original
    # image shape.
    result
    |> Yolo.NMS.nms(0.5)
    |> Enum.zip(classes())
    |> draw_bbox_with_labels(prepared_image)
    |> Image.trim()
  end
Next steps
This is a proof-of-concept only. The API will almost certainly change - not all use cases require painting a bounding box with labels. Feedback however is most welcome!.
Thanks again to @hansihe, the work is all his.
Last Post!
i-n-g-m-a-r
Popular in Announcing


Other popular topics


Latest on Elixir Forum
Sponsor Spotlight

Deploy Phoenix to your own VPS with PaaS ease: push-to-deploy, zero downtime, auto SSL, managed Postgres. 14-day free trial at potions.io
Categories:
Sub Categories:
Forums
Popular Tags
- #ecto
- #liveview
- #troubleshooting
- #learning-elixir
- #deployment
- #library
- #erlang
- #testing
- #genserver
- #mix
- #absinthe
- #remote-other
- #otp
- #plug
- #how-to-question
- #macros
- #postgres
- #channels
- #elixirconf
- #exunit
- #discussion
- #code-sync
- #javascript
- #podcasts
- #onsite
- #dialyzer
- #docker
- #authentication
- #umbrella
- #full-time-contract
- #podcasts-by-brainlid
- #ecto-query
- #elixir-ls
- #phoenix_html
- #iex
- #blog-post
- #graphql
- #genstage
- #ai
- #websockets
- #supervisor
- #elixirconf-us
- #advent-of-code
- #distillery
- #processes
- #api
- #forms
- #metaprogramming
- #security
- #hex
Our Sponsors

Build Elixir applications with speed and confidence.

Supporting innovation across the BEAM ecosystem.

We build reliable cloud platforms for business-critical systems.

Catch errors, track performance, monitor hosts and more.

Error tracking, logs, uptime, and Just Enough APM. Built for developers.

Develop your skills with books, videos, and courses.

Enabling companies to succeed by building software people love.
The deployment platform built for Elixir: PaaS ease, VPS control.

The team behind Membrane, Popcorn, LiveDebugger. Available for hire.

Courses that'll move you from confusion to "Aha, now I get it!"